Two Tier Solution: Deployment step by step
In this article, I walk through a two-tier architecture, where the application is hosted in a public subnet, while the database is secured in a private subnet. I automate the deployment of key infrastructure components, including VPC, EC2 instances, Elastic Load Balancer (ELB), and Amazon RDS
9/25/20248 min read
For this project I decided to create separate Terraform files. One of the advantages of using infrastructure as code (IaC) is that you can re-use, re-purpose the works that you have already done, so I decided to build this infrastructure in a way that I could use it, and save time, in future projects. In my GitHub repository you will find the following files:
terraform.tf: In this file I declare the remote backend that will manage the state file configuration for the App. It defines the version of Terraform that will be used, the required providers and the version constrains used for this application.
variables.tf: I use many variables to define attributes to various elements. I kept it in a variables file so I can easily adapt the same code to a different setup.
vpc.tf: This file deploys a VPC with 2 private and 2 public subnets. Creates a route table and associate to each subnet. Creates an internet gateway and associate it with the public subnet to give it access to internet connection
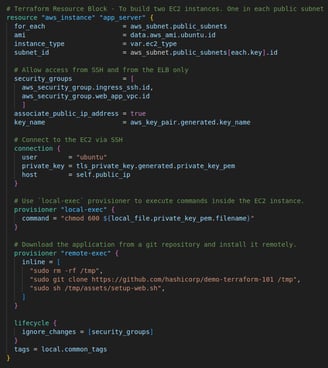
ec2.tf: This file searches for the latest Ubuntu 20.04 AMI Image from Amazon AMI Catalog. Generate a private key pair to connect to EC2 Instance via SSH. Launch one EC2 instance in EACH public subnet using the latest Ubuntu 20.04 AMI image. Connect to EC2 via SSH using the private key generated. Use 'local-exec' provisioner to execute commands inside the EC2 instance. Download the application from a git repository and install it remotely.
elb.tf: In this file we deploy the load balancer in public subnets and routes HTTP traffic to backend instances. A target group handles traffic forwarding, and the target group is associated with specific instances running in the VPC. The setup ensures security groups are applied, and Terraform will avoid timing issues with resource dependencies.
rds.tf: Here I define where the database will be hosted, the type of database, and how much storage to begin with.
security_group.tf: This file creates the security groups to allow access to the web application. It allows TCP traffic from anywhere to the Elastic Load Balancer via port 80. It only allows TCP traffic from the ELB into the EC2 instances. Protecting the EC2 from public access. It allows the EC2 instances to connect to the database via TCP port 3306. It creates a security group to allow SSH access via port 22 to install the app. It grants outbound access to anywhere to all security groups.
README.dm: Here I write a summary description of the steps taken for this project.

The challenge
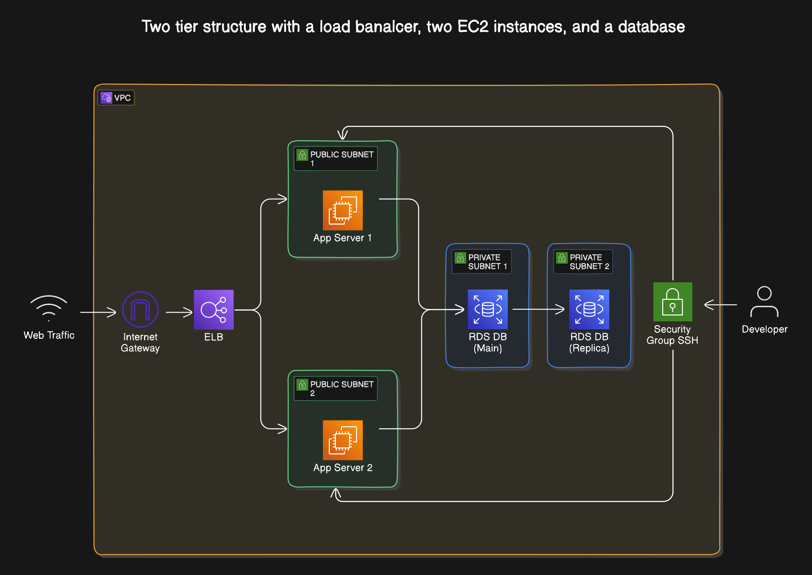
The challenge is to deploy an application that can communicate to a database via secure connection in the cloud. The application need to be highly available, cost effective, and easy to replicate.
To achieve that I deploy a VPC with 4 subnets, 2 public subnets to host the EC2 instances for the application, and 2 private subnets to host the database RDS. I also launch 2 EC2 instances in separate availability zones (AZ) in case one AZ fails the application would still work. I allow access via SSH to the EC2 instances so that I can install the application remotely.
Here is a diagram of the task:
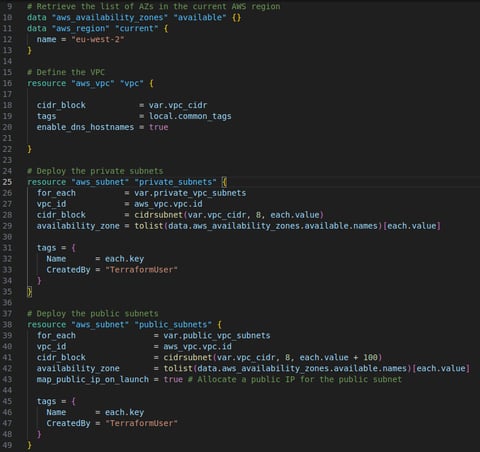
Step 1: Create the VPC
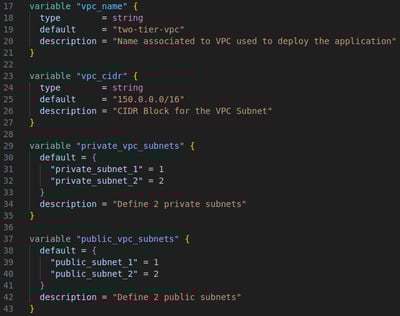
I deployed a Virtual Private Cloud (VPC) with two public and two private subnets in the eu-west-2 region, which is close to my location. This can be easily changed by updating the "aws_region" variable. The number and names of the subnets are defined in variables.tf, and I can adjust the infrastructure by simply modifying the "private_vpc_subnets" and "public_vpc_subnets" variables.
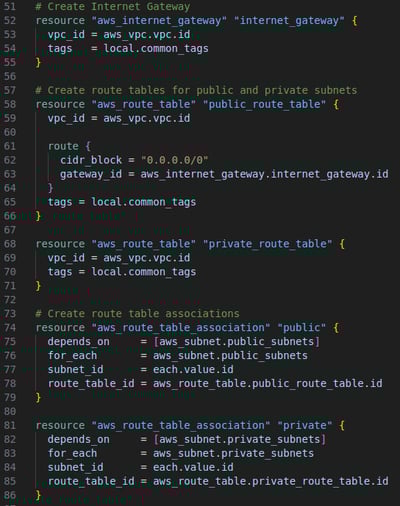
To configure the public subnets, I assigned a public IP at launch and created an Internet Gateway (IGW) with a route table that allows internet access. For the private subnets, I originally allocated a NAT instance to provide internet access, but later decided it wasn’t necessary. Since the private subnets are used only to store the database, and only internal EC2 instances need access, removing the NAT instance saved costs by avoiding the need for an Elastic IP and ongoing instance charges.
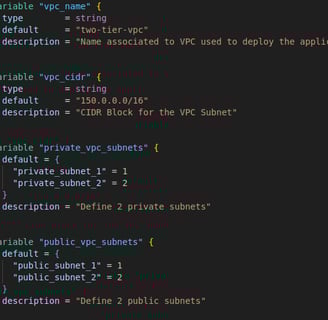
Variables:
Subnets:
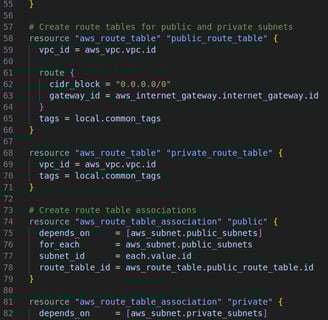
Routing:
Step 2: Launch two EC2s
This code automatically deploys two EC2 instances using the latest Ubuntu 20.04 AMI in two public subnets, sets up SSH access, and provisions the instances by cloning and installing a web application from a GitHub repository. For this project I used a t2.micro type of instance as it is eligible for free tier. This can be changed to suit the needs of any project by simply changing the value of the "ec2_type" variable. The infrastructure is flexible and can be easily modified for scalability and additional configurations.
Here's a detailed breakdown:
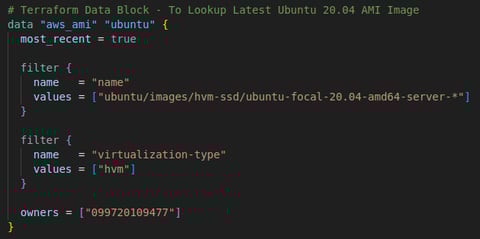
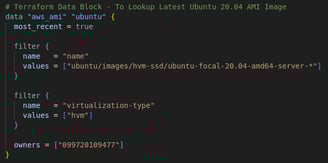
1. Lookup Latest Ubuntu 20.04 AMI Image
This data block fetches the most recent Ubuntu 20.04 AMI (Amazon Machine Image) from AWS. It filters for AMI images that match the name pattern ubuntu-focal-20.04-amd64-server-*. It also filters to ensure the AMI is HVM (hardware-assisted virtualization) compatible.
The owner ID 099720109477 refers to Canonical (the official publisher of Ubuntu images).
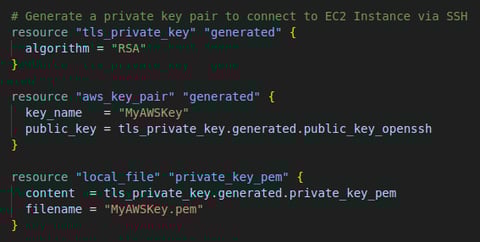
2. Generate SSH Key Pair
This section generates an RSA private key locally using the tls_private_key resource. It then creates an AWS key pair by taking the public key portion of the generated key and storing it in AWS as "MyAWSKey."
The private key is stored in a local file (MyAWSKey.pem), allowing SSH access to the EC2 instances.
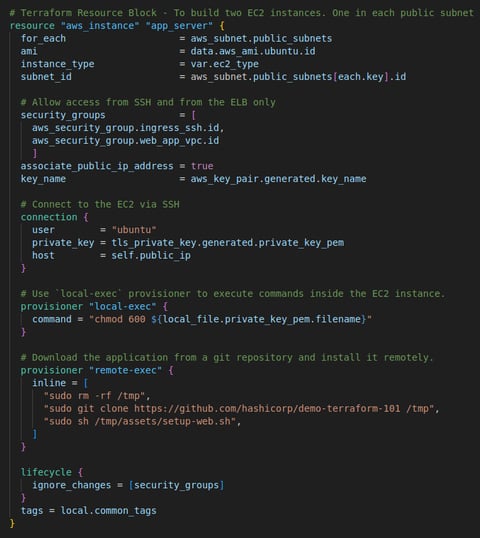
3. Provision EC2 Instances
Instance Creation: The for_each block ensures that two instances are deployed, one in each public subnet. The instance type is defined by the var.ec2_type variable as "t2.micro", which can be easily adjusted.
Networking: Each instance is placed in a specific public subnet, with public IPs associated, and is secured by two security groups: one allowing SSH access and the other for web application traffic (likely HTTP/HTTPS from the Load Balancer).
SSH Access: The instances is configured using the generated key pair. The private key is passed as part of the SSH connection.
Provisioners: Local-exec provisioner runs a local command to change permissions on the private key file for secure access.
Remote-exec provisioner: Runs a set of commands inside the EC2 instance to download and install an application from a GitHub repository. It:
Removes any existing files in /tmp.
Clones a demo repository (hashicorp/demo-terraform-101).
Executes a shell script (setup-web.sh) to install and set up the web application.
Lifecycle Management: The lifecycle block with "ignore_changes" ensures that the instance is not replaced when security group settings are modified. This is useful for avoiding unnecessary redeployment of the EC2 instance during updates.
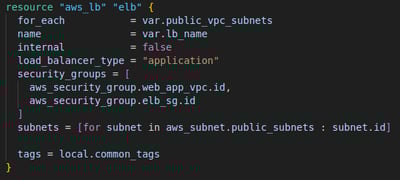
Step 3: Launch ALB
This code defines the configuration to deploy the Application Load Balancer (ALB), associate it with a target group, and register the two EC2 instances we launched to that target group. This setup is useful for distributing incoming traffic across multiple EC2 instances in a highly available, scalable manner. I could have added an Auto Scaling Group here to allow for spike in web traffic requests but for simplicity I decided I would skip that for now.
Here's a breakdown of what each section does:
1. Create an Application Load Balancer (ALB)
This creates a public-facing Application Load Balancer (ALB). I use a for_each to loop over the list of public subnets and associate the ALB to each public subnet so that the ALB is deployed in multiple subnets for high availability. I also marked the ALB as public-facing, making it accessible from the Internet. I associated the security group of the ALB and the EC2 instances.
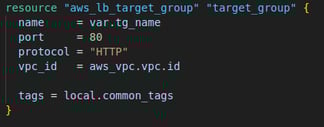
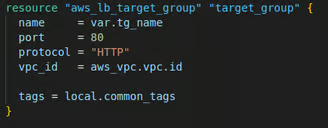
2. Create a Target Group
Here I define a target group for the ALB. A target group is a collection of servers (EC2 instances) that receive traffic from the ALB. I used a variable for the target group's name "tg_name" and specified that the target group will listen on port 80 for HTTP traffic.
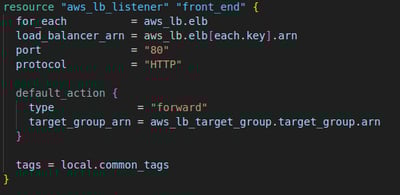
3. Create a Listener for the ALB
The next step I set up a listener for the ALB to handle incoming traffic on port 80 (HTTP). I use again a for_each to loop over all the load balancers created earlier, ensuring that each ALB has a listener. Any incoming traffic on port 80 is forwarded to the target group created earlier.
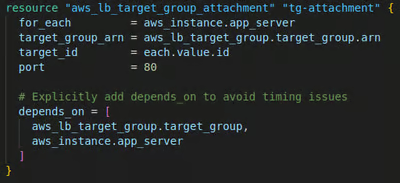
4. Attach EC2 Instances to the Target Group
Registers each EC2 instance with the target group. The target group communicates with the instances over port 80. I used a "depends_on" argument to ensures that the target group and the EC2 instances are created before attaching them to the target group, avoiding timing issues during deployment.


Step 4: Launch RDS DB
In this final step I set up an RDS MySQL database within the two private subnets the VPC, with a minimal configuration (10 GB storage, MySQL 5.7 engine, and a db.t3.micro instance type). The private subnets ensure the database is not accessible from the public internet, while the security group and other configurations enable control over access and scalability.
Here's a breakdown of what each section does:
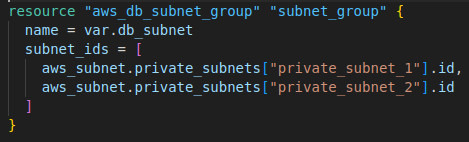
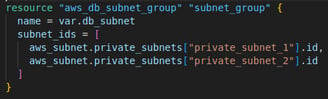
1. Create a subnet group for RDS Database
In here I create a DB Subnet Group, which defines which subnets the RDS instance can be placed into. This is necessary for launching RDS instances within a VPC. Istead of creating a new subnet, I specified that the RDS instance will be placed across the two already existing private subnets (private_subnet_1 and private_subnet_2) spreading the database across multiple subnets to improves availability and fault tolerance.
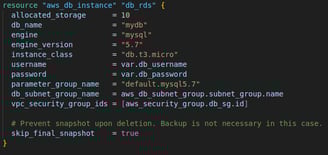
2. Create an RDS Database Instance (MySQL 5.7)
Finally I provision the RDS MySQL database with 10 GB storage allocated storage (size of the database) in a db.t3.micro burstable instance class,
ideal for small workloads at low-cost
The username and password used here is a variable that need to be declared outside of our code for security purpose.
I used a multi-AZ database and spread over the 2 private subnets created earlier to ensuring availability and resilience and used the associated security group (aws_security_group.db_sg) to control access to the database.
I set the "skip_final_snapshot" to true to disable the backup of the database upon deletion. As I have no intention to use this code commercially I don't really need a backup of the database when I destroy this project.

Cloud Professional
Optimizing cloud solutions for security and performance.
need a cloud solution?
Let's have a chat:
© 2024. All rights reserved.